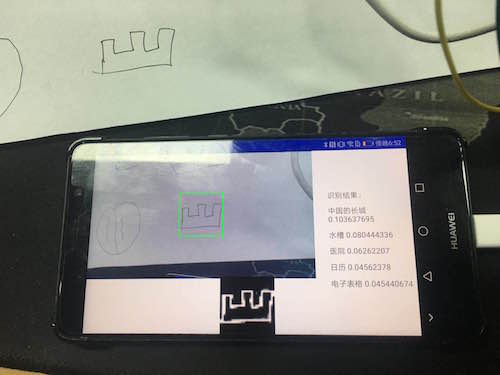
SketchGuess
This article introduces you to use HornedSungem to achieve hand-painted recognition under the Android platform.
Preparation
- For details on the configuration environment, please refer to quick start, I will not elaborate here.
- Download the model graph_sg, In your Android Studio, create a new assets package under the current module, copy the downloaded model file to this directory.
- Because the project needs to process and display the image, the javacv library is use. Developers can download it from GitHub or copy it from the official sample project to their own project.
- Copy the class_list.txt file to the storage space of the Android device for identification of 345 objects.
Implementation
Turn on device communication.
int status = openDevice();
if (status != ConnectStatus.HS_OK) {
  return;
}
Create an instance of a Graph that represents a neural network
int id = allocateGraphByAssets("graph_sg");Read the object classification file
try {
BufferedReader bufferedReader = new BufferedReader(new FileReader(Environment.getExternalStorageDirectory().getAbsolutePath() + "/hs/class_list.txt"));
for (int i = 0; i < 345; i++) {
    String line = bufferedReader.readLine();
    if (line != null) {
        String[] strings = line.split(" ");
        mObjectNames[i] = strings[0];
    }
}
bufferedReader.close();
} catch (FileNotFoundException e) {
e.printStackTrace();
Log.e("SketchGuessThread", "FileNotFoundException");
} catch (IOException e) {
e.printStackTrace();
Log.e("SketchGuessThread", "IOException");
}
Get the camera image built into HornedSungem.
byte[] bytes = deviceGetImage();
Node: Developers can also choose their own external camera data.
Preprocess the image.
opencv_core.IplImage bgrImage = opencv_core.IplImage.create(FRAME_W, FRAME_H, opencv_core.IPL_DEPTH_8U, 3);
bgrImage.getByteBuffer().put(bytes_frame);
int sg_weight = (int) (FRAME_W * roi_ratio);
//crop
opencv_core.CvRect cvRect = opencv_core.cvRect((int) (FRAME_W * (0.5 - roi_ratio / 2)), (int) (FRAME_H * 0.5 - sg_weight / 2), sg_weight, sg_weight);
cvSetImageROI(bgrImage, cvRect);
opencv_core.IplImage cropped = cvCreateImage(cvGetSize(bgrImage), bgrImage.depth(), bgrImage.nChannels());
cvCopy(bgrImage, cropped);
//canny
opencv_core.IplImage image_canny = opencv_core.IplImage.create(sg_weight, sg_weight, opencv_core.IPL_DEPTH_8U, 1);
cvCanny(cropped, image_canny, 120, 45);
//dilate
opencv_core.IplImage image_dilate = opencv_core.IplImage.create(sg_weight, sg_weight, opencv_core.IPL_DEPTH_8U, 1);
//kernel = np.ones((4,4),np.uint8)
opencv_core.IplConvKernel iplConvKernel = cvCreateStructuringElementEx(4, 4, 0, 0, CV_SHAPE_RECT);
cvDilate(image_canny, image_dilate, iplConvKernel, 1);
opencv_core.IplImage image_dilate_rgba = opencv_core.IplImage.create(sg_weight, sg_weight, opencv_core.IPL_DEPTH_8U, 4);
cvCvtColor(image_dilate, image_dilate_rgba, CV_GRAY2RGBA);
//resize
opencv_core.IplImage image_load = opencv_core.IplImage.create(28, 28, opencv_core.IPL_DEPTH_8U, 4);
cvResize(image_dilate_rgba, image_load);
Bitmap bitmap_tensor = IplImageToBitmap(image_load);
Message message1 = new Message();
message1.arg1 = 2;
message1.obj = bitmap_tensor;
mHandler.sendMessage(message1);
int[] pixels = new int[28 * 28];
bitmap_tensor.getPixels(pixels, 0, 28, 0, 0, 28, 28);
float[] floats = new float[28 * 28 * 3];
for (int i = 0; i < 28 * 28; i++) {
floats[i] = Color.red(pixels[i]) * 0.007843f - 1;
floats[3 * i + 1] = Color.green(pixels[i]) * 0.007843f - 1;
floats[3 * i + 2] = Color.blue(pixels[i]) * 0.007843f - 1;
}
int status_tensor = loadTensor(floats, floats.length, id);
Get the returned processing result.
float[] result = mHsApi.getResult(id);Process the return value and arrange the position corresponding to the maximum 5 numbers.
public String[] sortMax5(float[] result) {

   HashMap<Integer, Float> integerFloatHashMap = new HashMap<>();
   String[] object_names = new String[5];
   for (int i = 0; i < result.length; i++) {
       integerFloatHashMap.put(i, result[i]);
   }
   Arrays.sort(result);
   for (int i = 0; i < result.length; i++) {
       if (integerFloatHashMap.get(i) == result[result.length - 1]) {
           object_names[0] = mObjectNames[i] + " " + result[result.length - 1];
       }
       if (integerFloatHashMap.get(i) == result[result.length - 2]) {
           object_names[1] = mObjectNames[i] + " " + result[result.length - 2];
       }
       if (integerFloatHashMap.get(i) == result[result.length - 3]) {
           object_names[2] = mObjectNames[i] + " " + result[result.length - 3];
       }
       if (integerFloatHashMap.get(i) == result[result.length - 4]) {
           object_names[3] = mObjectNames[i] + " " + result[result.length - 4];
       }
       if (integerFloatHashMap.get(i) == result[result.length - 5]) {
           object_names[4] = mObjectNames[i] + " " + result[result.length - 5];
       }
   }
   return object_names;
}
The result is displayed on the view, the effect is as shown:

Friendly Node: Because Android devices are basically USB2.0, the transmission is time consuming, there will be a feeling of stagnation, so it is not recommended to use 1080P images, you can use 360P images, spread the screen.
The code can be downloaded from GitHub, the address is as follows SungemSDK-AndroidExamples